Showing posts with label handmaking with kids. Show all posts

Monday, June 25, 2012

proud mommying moments: handmaking, perfectionism & the pioneer farm


pioneer farm project handmade by little rikrak / images by me : kristal davis / rikrak

..................


confession time:
now don't tell anyone, but i can be a super-over-bearing perfectionist-seeker of a mommy! 
i know, you're probably not shocked, right sweeties? :) 

we all want the best for the children in our lives. 
i do too.
but sometimes i'm a meddling mommy
i want to involve myself in every step of every project to make sure it's as perfect as perfect can be. 
i'll admit: that's not always helpful. :)

so here's a proud mommying moment (and handmaking life lesson) i wanted to share with you all...

............

so little rikrak had a fun school project last month: the pioneer farm.

  • first there was lots of adorable research. (think supercute little-one handwriting!)
  • then trips to various hands-on sites. (feeding cows, visiting pioneer barns, touching great great great great grandfather-made tools. splendid!)
  • then an essay rough copy. edit. & good copy.
  • then practicing a fun interactive presentation.
  • then building a beautiful model.

through all of it... i wanted to get my mommying 2-cents worth in. but the best lesson of all for me? as tough as it might be, let your little ONE shine! 

if you've ever been privy to a child working on a project, i think we can all agree... it's VERY tempting to try and lend a hand (or lend many hands!) , especially as obstacles arise.

but i had personally decided to be the most hands-off, support from the side kinda helper i could be for this project. i could see the excitement in little rikrak's eyes as he brainstormed fabulous idea after fabulous idea, many of which i couldn't have thought of. 
we all have our own fabulous perspectives, don't we?!

needless to say i'm over the moon proud of little rikrak's hard work and creative figurings on his latest life project.

and just look at this wonderful DIY model!
the cute handcut bales of hay.
the fun pipe cleaner oxen yoke.
the handmade, not factory-made or mommy-made wonderfully child-drawn marker lines on the barn roof.
he MADE that. 
what joy there is in that sentiment, for each of us!
 
many a time i wanted to get in there and "fix" or "alter" or "adjust" something. 

BUT i KNOW there is great learning, and beauty, in the handmade. "imperfections" and all.
it's a value our family shares deeply.
sometimes my quest for perfection as a mommy invades that ethic.
i struggle with it.

i know some day we'll have to dismantle this fabulous model (unless we can build a *museum for everything little rikrak has handmade* 3rd floor addition to our home! mr.rikrak?)

but for now i just look at it all day on my desk and smile.
and best of all: the pride on his face for a project he handmade. that's a wonderful thing, indeed!

isn't it magical when little ones work hard, overcome challenges and see a project thru with vim & vigour.

well done, sweetie pie. i'm so proud of you.
(and don't you love the open-up barn roof and removable hay loft? makes for hours of fun playing, let me tell you!)

did i tell you how i FORCED us to watch little house on the prairie episodes as bonus *research?* LOVE IT!

tell us something you're proud of in your little ones' lives.

how do you step back and let the little ones in YOUR life shine?


yay to handmade families.

..................

pioneer farm project handmade by little rikrak / images by me : kristal davis / rikrak


Pin It

Wednesday, June 13, 2012

handmaking with kids : DIY lacing beads


fresh off her 2012 Handmade Olympics GOLD medal (where her gorgeous wooden stacking bowls were voted favourite eco-goodie!) , gail of *bright life toys* is sharing a fun & fabulous lacing beads DIY with us today! you'll just love this easy & charming project, as well as adoring the creative play for creative kids toys in gail's gorgeous, bright & beautiful handmade shop. too!

yay to handmaking with kids!
and yay to beautiful handcrafted toys for kiddies, too!

bright life toys


MAKING LACING BEADS with the KIDS!
Materials Needed - (these can all be found at your local craft store)
-non toxic craft paint in a variety of colors
-paint brushes
-wooden beads in a variety of sizes
-a length of ribbon, shoe string or yarn
-someplace to set the beads while they dry (I used an old pie plate)
-plate (or palette, if you want to get fancy)
-nontoxic wood sealer*
........................

Lacing beads help a child to learn colors, shapes and sizes. They help to develop fine motor skills and coordination. Your little one will enjoy learning to sort, count and thread while playing with his / her lacing beads!

Due to the sizes of the pieces, I recommend this set for children 3+ or those that no longer mouth their toys. If the chosen beads are small, they can pose a choking hazard.

Wooden beads come in all shapes and sizes. For an easier set, use larger beads with a larger threading hole. For a more challenging set for older children, use smaller beads with a smaller threading hole.
........................ 

ONE: To begin this project, open the paint, and squirt a little of each color onto the plate, allowing plenty of room between colors. (Not that it will matter, because if your child is like mine, they will all get mixed together anyway.)
TWO: Dip the brush in the paint, and begin to paint each wooden bead. Allow your child's creativity to truly shine! 

THREE: When the bead is painted, set it on its end on the pie plate to allow it to dry.

FOUR: Allow the beads to dry for 3 hours, or until paint is dry to the touch.

FIVE: When the beads are dry, it is time to seal them. You have a couple of options - you can use a nontoxic wood sealer, which will make your paint shiny and protect it from color transfer or you can use beeswax wood polish. The choice is yours. The wood sealer can be found at local craft shops in the craft paint section.

If choosing to use a wood sealer, gently brush it on using a paint brush. This should be a grown-up job, as it can be messy. Set the beads on their ends once again to dry. Let dry overnight.
SIX: Once they are dry, it is time to play! Depending on your child's age and skill, you can use several things for the lacing part of this toy. Beginners (younger children) can start out with a shoestring. The end is easy to thread through the beads. More advanced / older children can use a ribbon or length of yarn. It will be more difficult to thread the bead onto.

For ease, you can tie a knot around one bead to prevent the others from slipping off.

Enjoy stringing the beads with your child!
.................
thanks so much, bright life toys! be sure to visit gail's other creations around the web, too!

made anything fun with kiddies lately?
tell us about it!


Pin It

Thursday, April 26, 2012

patterns and shapes: the DIY nest project


:: lovely handmade nests ::  
DIY pasta & tissue paper nest by little rikrak (how-to below!) 


there's such magic in the natural architecture of a springtime nest.
it's pefectly imperfect construction of found materials to make a wee little home.

love it.

this week on pinterest & instagram i shared one of my fave recent *little rikrak* DIY projects: an adorable nest keepsake he made at school. so sweet!

here's how to make one at YOUR home!

(seen any new nests around your neck-o-the-woods, nicies?) 

............

PASTA & TISSUE PAPER NEST DIY for kiddies!

1. break whole wheat uncooked spaghetti pasta into smaller lengths.
2. line a medium sized bowl with plastic wrap or foil.
3. add spaghetti with a bit of white glue. mix.
4. gently make into nest shape with hole/pocket in centre.
5. let dry overnight. remove from bowl.
6. add cute tissue paper scrunched eggs.
(*how to* as described by cute little rikrak! some details guessed by me!)


Pin It

Tuesday, March 13, 2012

25 FUN, fabulous & inexpensive DIY projects for kids this march break!


..............

well it's march break here in my little part of the world: a week when the kiddies are off school and i'm always looking for fabulous & fun things to do and make and learn about with little rikrak, while keeping our budget low!

so i thought i'd gather a few fabulous handmaking with kids projects from around the blogosphere so all those parents & care-givers can have lotsa fun with these DIY-filled handmaking projects!

i've included some for little hands and some for older kids, too! we all need a little handmaking on the march break!

 ..............


* for the tech-savvy young artist: start off with this fabulous DIY animated flipbook (seen below!) on benetton play (they have LOTS of fun animation activities for kids of all ages in their *toy box*

* moss terrarium project by artmind via poppytalk
 
* my very own how-to-make a kids custom stenciled tshirt tutorial, featuring your own child's art!
* and maya*made's blow art monsters look superfun!
* make any one of these bright & beautiful rainbow baking recipes (just in time for st. patrick's day!) on canadianfamily.


* any of the kid concoctions ideas (they're ALL under $1 to make! BUY the books!) like this fun treasure stone recipe!
* bananasaurus rex's fun newspaper flower DIY 

* maya*made suggests this great kite tutorial
* karen meyer's superfun recycled kids hat tutorial


* try this great trashion recycled mini notebooks tutorial
 
* paisley baby's fun DIY tiedye socks.
* cool DIY duct tape wallet

* fun soaps for kids to make on whipup

* get those kiddies organized with this fun cereal box storage unit from ecoetsy
 
* apartment therapy's charming DIY silhouettes

* make your own finger paint from martha stewart


* or maybe learn some basic weaving with martha

*  how about these gorgeous paper wigs to add a little fantastical fun to the week!

* and finally: once again for the tech-loving artists: remember wordle.net? we just rediscovered it & little rikrak's loving the wordy fun! & how about scribblertoo (so addictively fun!) 
happy handmaking!

...........


Pin It

Monday, December 12, 2011

handmaking with kids: best toys ever!


..............

still looking for that perfect toy gift for the wee ones?
look no further than the neighbourhood park or front lawn.
love love LOVE this fabulous post over at geekDad where jonathan liu reminds me about the virtues of: 

the stick
a box
string
a cardboard tube
& dirt.

yes. good old dirt.

so true.
so true.

oh the endless possibilities all around us!
{thanks for the fun link, mr. rikrak!} 
Pin It

Wednesday, May 4, 2011

handmaking with kids: scribbler too


all images by little rikrak 2011
.............. 
love webby lines?
love connecty curves?

little rikrak & i happened across the free online sketch tool *scribbler too* last week and we just love it!

something about all those offshooting tangents!

great for unique detail work or abstract playing, we'd recommend it for all of the wee little artists out there (and let's be honest... us grown up ones, too!)

warning: highly addictive fun! 

do you have an online handmaking site you and a little one love?
we'd love to hear.


Pin It

Friday, April 22, 2011

up close & personal: art


...............

while we're all dunking & dying our beautiful Easter Egg masterpieces this weekend, this time of year always gets me excited about detailed art. i've come across a couple of brilliant websites that both little rikrak and i love for online viewing of some of the world's most famous artworks!

how about the very best view we're ever going to get of the amazing sistine chapel: michaelangelo's masterpiece.visiting vatican.va, you can zoom in on the most intricate details of this amazing work (and perhaps best of all - no throngs of crowds to compete with!)

or using google street view technology, how about viewing your favourite art gallery masterpieces from around the world; up close and personal on Google Art Project (look at the brush strokes! wow!)

the kids will love it!
and i think you might too, cuties!

have a beautiful, inspiring weekend, nicies.

 ............

 detailed view of  vincent van gogh's *wheat field with cypress trees*


Pin It

Monday, January 24, 2011

handmaking with kids: DIY burlap tic tac toss game tutorial


once upon a time { this past december! } i was the lucky lucky winner of a fabulous handmade giveaway ... a beautiful set of wooden skittles by the design house *wee waldorf.* i've long been a fan of this fabulous handmaking for children shop & i have to say, seeing the work in person is even MORE amazing. it's beautifully crafted, with a gorgeous design and great attention to detail! i'd highly recommend this lovely shop & the fabulous wee waldorf blog (it's FILLED with fabulous tutorials and tips!)

and now...  designer luz has prepared a fabulous DIY children's tutorial for all of us ... and wouldn't it make a fabulous valentine's - day- is -coming- up project! yay!

...............

Burlap Tic Tac Toss by Wee Waldorf 
Materials:

~1 square burlap fabric (22"x 22")
~20 squares burlap fabric (6"x6" each)
~10 squares freezer paper (6"x6" each)
~8 lbs dried beans or other filler
~scissors
~fabric paint
~paint brush
~iron
~masking tape
~marker

Step 1.
Fold your 22"x22" square into thirds and mark a long line creating 3 equal sections. Then rotate and do the same. You should now have 9 equal squares.
 Lay a long piece of masking tape about 1/2" away from the marker line on both sides giving you a 1" paint line.

Step 2.
Paint within the tape lines. Allow to dry and remove tape.


Step 3. 
Now grab your freezer paper and cut out five X's and five O's and iron stencils onto your  6"x6" burlap squares. 

Step 4.
Paint within the  X's and O's stencils. Let dry and remove stencils.

Step 5.
Pin right sides of burlap squares together (1 stenciled square and 1 plain square), stitch sides leaving a small hole to turn.

Step 6.
After turning right side out fill each bag with about 1 1/2 cups of beans.

Step 7. 
Tuck opening in and stitch closed. Continue all the way around the bean bag to create a finished edge.  

Step 8.
Now go play!


...............
thanks so much, wee waldorf. 
for everything! :)

and.... be sure to visit the wee waldorf shop... it's delightfully swoonworthy with a flurry of beautiful, handmade children's and baby's items. 

gorgeous. 
{& don't forget to nominate YOUR favourite handmade items for children in event 2 of the *handmade olympics* right over here, nicies!


Pin It

Monday, December 6, 2010

the etsymom blog hop & a sweet salt dough ornaments DIY

 photo by John Paul Urizar via taste.com
.................
morning, nicies!
today begins the EtsyMom blog hop, a chance to visit lots of great blogs by handmaking mommies, share in some fabulous festive recipes and craft ideas, AND win a bunch of amazing goodies while you're at it! 

so to kick things off, thought i'd share one of my family's favourite crafty recipes with you. 
it's a great chance to encourage little hands and their creative imaginations!
 
One-of-A-Kind Keepsake Salt Dough Ornaments Tutorial & Recipe

DIY family ornaments ideas at country woman magazine
Every year, one of our family's favourite Holiday events is the annual tradition of handmaking Christmas Tree Ornaments! As an adult, our tree is filled with those treasured keepsakes my hubby + I created as children alongside our own little one's festive creations! I just love it!

So here's a festive handmade Holiday ornament for you and your child to create! The project is a perfect make-together activity  filled with lots of opportunities to be creative in the kitchen. Using a classic salt-dough recipe, we'll add modern abtsract painting fun! The result is a gift-giving collection of beautiful, original ornaments featuring one-of-a-kind abstract artwork by your budding little Picasso! It's fun for artists of all ages and it's a wonderful, hands-on introduction to the world of modern abstract painting, too!  The ornaments are fun to give individually, in small sets of 3, or why not wrap up a whole set for grandma or grandpa! Don't forget to save some for your own tree - those little artworks will be treasured for many Happy Holidays to come!! Happy creating!

WHAT YOU'LL NEED
2 cups flour + a bit more for dusting
1 cup salt
1 cup warm water
mixing bowl or food processor
rolling pin
cookie cutters
straw
baking tray
oven
child-friendly paints
paint brushes
ribbon or string
thin tip marker
your delightful imagination!

  .................
 ornaments by little rikrak :: photo by me

making fun 3D shapes on diynatural.com
HOW TO DO IT
*It's the most fun if your child can participate in all of the steps along the way! Making a BIG mess is half the fun! *

1. Mix salt & flour.

2. Add in half the water, mix, then gradually add the remaining water.

3. Knead mixture until the dough is smooth (up to 10 minutes by hand; about 2 minutes on low via food processor.) Add pinches of flour to create a pliable dough that isn't sticky.

4. For flat dough ornaments, roll out the dough on baking paper or a floured surface. Aim for a dough thickness of about 1/4 -1/2 inch. This will be sturdy enough for little hands to help transfer to the baking sheet, and not too thick for even baking.

5. Using fun cookie cutters or your hands, create fun shapes. Remember, the top surface of the *cookie* shape will be your child's canvas - so aim for a greater surface in the shapes you choose. It will be easier for young hands to create their masterpieces! (Circles, stars, snowflake shapes work well!)

getting the ornaments ready for baking on e-how.
6. Once cut, use a spatula to transfer cutouts to a baking sheet.

7. IMPORTANT: BEFORE BAKING  --> USE the STRAW to make a hole near the top so you can hang the ornament later.

8. Bake the ornaments at 325 degrees for 30-40 minutes, depending on the thickness of the ornaments - or until dry. While the ornaments are baking, this is a great time to talk with your little one about the fun & freedom of abstract painting. Experiment on paper before working with your ornaments so your child can get a feeling for freestyle  painting. Share fun modern art books or websites to enrich the experience. Chat about the terminology of artistic experimenting: dots, lines, colours, curves, shapes, feelings. etc. and encourage your child to paint freely to various emotive words: happy, sad, excited, etc. Practice these for fun on paper. Paint with your child! They'll love seeing how you interpret the emotions, too! Remember - there is no right or wrong in abstract painting!

9. Let ornaments cool before you begin decorating.

10. Let the creativity begin! Turn on some festive music and let your little picasso enjoy splattering and splotting and decorating the tiny ornament surfaces with a variety of paintbrushes! Children 3 and up might love using 3-D puffy paints once a base coat is painted. They add extra texture and dimension to the sweet ornaments. Try painting some of the surfaces a solid colour, letting those dry, and adding new delights on top! Try gluing on beads, buttons, or any fun goodies you can think of. Let your creativity soar!

11. Optional: to preserve, coat with a child-safe paint varnish once everything is dry!

12. Loop string or ribbon thru dried ornament. Wrap in eco-friendly paper your child has decorated, and your handmade Holiday ornament is ready to give!

13. This recipe makes an ornament collection of approximately 20 2-inch wide ornaments, although it's much funner when each ornament is it's own unique size!

FUN NOTES:
- Older children might enjoy making 3 dimensional shapes with greater details.

- Experiment with using various fun kitchen *tools* to add texture to the top of the ornament dough before baking. try finger prints, child-safe kitchen utensils, etc.  Play with the patterns and shapes they create!

- Use the marker to have your child print their name on the back of the dried ornament (or adults can help!) and add the year for extra keepsake fun!

Happy handmade holidays!

Kristal Davis a.k.a. rikrak
my handmade shop: www.rikrak.etsy.com
my handmade blog: www.rikrakstudio.blogspot.com


and now....
off to see the rest of the fabulous blog hop!


Check out all of the fabulous holiday-themed projects, gift ideas, and more from our wonderful EtsyMom Blog Hop Contributors from around the world!!


Here's how it works:
1. Hop through each of the blogs listed above to get fabulous holiday inspiration and leave a comment. If you are starting at a blog in the middle of the Hop, start back at the EtsyMom Blog.
2. Leave a comment on this post between now and December 11, 2010.
3. Enter to win our giveaway by doing any of the following. For each thing you do, you will be entered into the drawing one more time:

~Leave a comment on this post between now and December 11, 2010.
~Leave a comment on the Holly Day Blog Hop posts for any of the blogs listed above between Dec 5 and Dec 11, 2010.
~Join our email list (fill out the form in the right hand column).
~Become a follower of this blog! Just click the "Follow" button in the lower right column.
~"Like" the
EtsyMom Facebook Page.
Share about this Blog Hop on your own blog, posting a link to this page.
Share about this Blog Hop on Facebook, posting a link to this page.
Share about this Blog Hop on a message board or forum, posting a link to this page.

To let us know you've done these things, please GO to 
sorry - you cannot enter the giveaway here on my blog.  
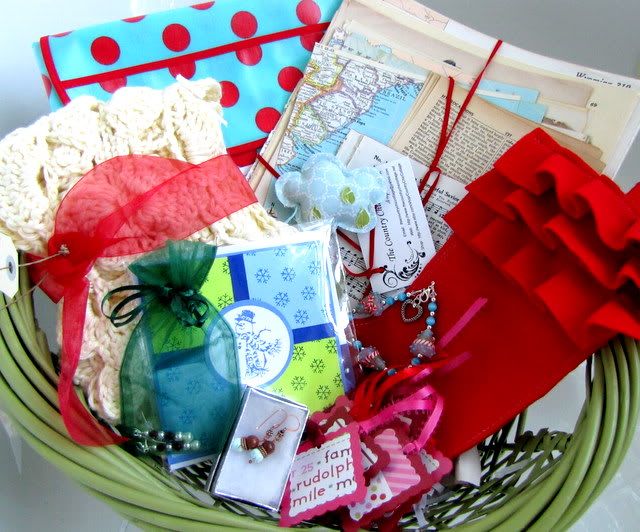
 and leave a comment for each thing you did, i.e. one comment for posting on your blog, another comment for posting on facebook, and another comment for joining our email newsletter. If you post it all in one comment, it will count as one entry.On December 11, 2010 we'll choose a winner using the Random Integer Generator from random.org. The winner will receive this super sweet gift basket full of handmade holiday goodies, including


a pair of Turquoise Earrings from http://www.stoneymistdesign.etsy.com/
a lampwork bead bracelet by http://handmadewhimzy.etsy.com/
sterling silver and Swarovski pearl/crystal holiday earrings by
a cream colored cotton scarf given by http://www.zoegirldesigns.etsy.com/
a raincloud ornament from http://www.etsy.com/shop/babyjives
a matching splat mat and baby bib from http://www.babysindulgence.etsy.com/
two pair of earrings from http://quirefly.etsy.com/
a gift pack of over 30 pages of vintage paper ephemera by http://www.etsy.com/shop/countrychiccottage
a lovely sustainable stocking from http://www.rikrak.etsy.com/
a set of holly jolly gift tags from http://cinnamonspice.etsy.com/
a set of toddler pajamas in a style of the winner's choice from http://heatheregley.etsy.com/
a $15 gift certificate from http://camelotstreasures.etsy.com/
A gift certificate from http://babyswank.etsy,com/


have a great day, cuties!
Pin It