Showing posts with label diy. Show all posts

Thursday, February 7, 2013

gathering pins {calligraphy & handwriting}


............


cheers the swell in adoration for calligraphy & handwriting of late! so i'm gathering lovely calligraphy & handwriting pins over on pinterest


and wonderfully... there's just enough time to practice your own hand at romantic lettering before valentine's day. love lettering here we come!


happy writing, lovelies!

Pin It

Wednesday, September 12, 2012

the amazing 2 dollar DIY bed headboard project!


...............................

it's true!
here's my DIY $2 headboard project.

we've just completed a makeover on the guest bedroom at my mom's home. (more photos on the complete, inexpensive before and after soon!)

our budget to redo the entire room was under $100. crazy right? yes. 
do-able/ (with lots and lots of repurposing?)
yes!

thought you'd like a sneak peek at one of the very best budget-wise projects: the $2 headboard.

i think a headboard just finishes things off lovely-like.
and we needed something extra-budget-friendly at the end of the project. (repurposing an old headboard or door was even over budget! so was buying enough paint to paint a headboard on the wall!)  so we put on our creative thinking caps and came up with this cutie!

here's the secret ...
it's kinda a fake headboard.
what could be lovelier than that?

perfect for a spare room!


here's what you will need to complete this easy project:
(i'm sure you probably have most of them at home already!) 
  • 1 roll of con-tact shelf paper in your choice of colours. con-tact paper has a decorative front and a sticky-adhesive backing. it usually comes in rolls.  (i choose lovely & solid bright white!)  = $1.00 at dollar stores. also available at most home or craft stores
  • measuring tape
  • straight ruler
  • pencil
  • green painters tape = $1 (it won't leave any marks on your wall)
  • level if you have one (i didn't)
  • scissors or exacto knife 
...................................

how-to!
1. decide on a design for your headboard. 
i went with the modern & minimalist look of a geometric & straight rectangle. but you could choose any symmetrical shape. (try searching *headboard shapes* on google or take a look at these ideas here. )


2. using a measuring tape, decide on the dimensions of your new headboard. 
using a pencil, gently mark how high and how wide you'd like your headboard to be on the wall. stand back and double check that you love it. take measurements.


3. lay out your con-tact paper on a flat surface. using the easy grid lines on the back of the adhesive paper, mark out the dimensions of your new headboard. (i chose to make mine only as tall as one width of the roll, and slightly longer than the bed & matress. this way i only had to make one cut! but you could easily overlap the contact paper to make higher or wider shapes. )

4. being extra careful not to bend or crease the con-tact paper, cut out your headboard using scissors or an exacto knife.

5. rip off a few pieces of the green painters tape. with the wrong side/sticky side of the contact paper facing the wall, carefully use the green tape to HOLD your headboard in place. use the level to check that the headboard is straight. (or eye-ball it!) - erase and pencil marks that you can see off the wall. 


6. once in place perfectly, start in the top corner (i worked from top left to right.) begin to carefully peel off the backing paper from underneath. this part can be a bit tricky. i recommend going as slowly as possible so as to not tear the headboard. peel off a medium sized vertical section, let the backing paper hang, and use the straight ruler to gently push out any airbubbles in the headboard (similar to wallpapering). after that, use your finger/hand to push directly onto the contact paper to increase the bond.

7. repeat step 6 until the headboard is attached fully, with a strong hold, and there are no air bubbles.

8. tada!


i love the look. it's fresh and clean and has stayed put!

......................

notes: the contact paper i used took on the painterly texture of my wall underneath. i like the look, but if you want a more solid look, try looking for thicker contact paper. (hey - mine was only a dollar after all!)

i considered using mod podge to finish the edges, but so far that hasn't been necessary.it's stayed in place beautifully. 

con-tact paper is a brand name, but i'd guess that any adhesive back shelf paper would do! 

...................... 

try it for yourself! the possibilities are endless! 
here's a peek at the before & after for the whole guest room!
what was once dark & dingy is now bright & light!
done any fun before & after projects lately? 
leave me the link - i'd love to see!


Pin It

Wednesday, June 27, 2012

custom family portraits


how-to cross stitch family portrait via marthastewart.com

................

family is a magical, mysterious thing sometimes, isn't it?
i've been especially inspired this week about how-to depict family artistically thanks to the amazing TIMO handmade

don't you just love this martha stewart project with custom DIY family cross-stitch artworks? wow!

how do you capture your family's unique nature creatively?
we'd love to hear!

AND... speaking of family, congrats to the WINNER of the TIMO handmade $40 gift certificate giveaway #105 jo of *the hungry crafter!* {what a gorgeous blog you have, nicey!}  ... now you can buy your own wonderful handmade family!  

PLUS ... still a little bit of time to enter 2 other great giveaways happening here on the rikrak blog: 

ENTER TO WIN :  the handmade world cup ( a $30 gift certificate giveaway to the Etsy shop of your choice!) - voting for this FINAL ROUND closes thursday!

ENTER TO WIN: the june *i love my sponsors* $25 gift certificate giveaway! 

have a great day, nicies!


Pin It

Monday, June 25, 2012

proud mommying moments: handmaking, perfectionism & the pioneer farm


pioneer farm project handmade by little rikrak / images by me : kristal davis / rikrak

..................


confession time:
now don't tell anyone, but i can be a super-over-bearing perfectionist-seeker of a mommy! 
i know, you're probably not shocked, right sweeties? :) 

we all want the best for the children in our lives. 
i do too.
but sometimes i'm a meddling mommy
i want to involve myself in every step of every project to make sure it's as perfect as perfect can be. 
i'll admit: that's not always helpful. :)

so here's a proud mommying moment (and handmaking life lesson) i wanted to share with you all...

............

so little rikrak had a fun school project last month: the pioneer farm.

  • first there was lots of adorable research. (think supercute little-one handwriting!)
  • then trips to various hands-on sites. (feeding cows, visiting pioneer barns, touching great great great great grandfather-made tools. splendid!)
  • then an essay rough copy. edit. & good copy.
  • then practicing a fun interactive presentation.
  • then building a beautiful model.

through all of it... i wanted to get my mommying 2-cents worth in. but the best lesson of all for me? as tough as it might be, let your little ONE shine! 

if you've ever been privy to a child working on a project, i think we can all agree... it's VERY tempting to try and lend a hand (or lend many hands!) , especially as obstacles arise.

but i had personally decided to be the most hands-off, support from the side kinda helper i could be for this project. i could see the excitement in little rikrak's eyes as he brainstormed fabulous idea after fabulous idea, many of which i couldn't have thought of. 
we all have our own fabulous perspectives, don't we?!

needless to say i'm over the moon proud of little rikrak's hard work and creative figurings on his latest life project.

and just look at this wonderful DIY model!
the cute handcut bales of hay.
the fun pipe cleaner oxen yoke.
the handmade, not factory-made or mommy-made wonderfully child-drawn marker lines on the barn roof.
he MADE that. 
what joy there is in that sentiment, for each of us!
 
many a time i wanted to get in there and "fix" or "alter" or "adjust" something. 

BUT i KNOW there is great learning, and beauty, in the handmade. "imperfections" and all.
it's a value our family shares deeply.
sometimes my quest for perfection as a mommy invades that ethic.
i struggle with it.

i know some day we'll have to dismantle this fabulous model (unless we can build a *museum for everything little rikrak has handmade* 3rd floor addition to our home! mr.rikrak?)

but for now i just look at it all day on my desk and smile.
and best of all: the pride on his face for a project he handmade. that's a wonderful thing, indeed!

isn't it magical when little ones work hard, overcome challenges and see a project thru with vim & vigour.

well done, sweetie pie. i'm so proud of you.
(and don't you love the open-up barn roof and removable hay loft? makes for hours of fun playing, let me tell you!)

did i tell you how i FORCED us to watch little house on the prairie episodes as bonus *research?* LOVE IT!

tell us something you're proud of in your little ones' lives.

how do you step back and let the little ones in YOUR life shine?


yay to handmade families.

..................

pioneer farm project handmade by little rikrak / images by me : kristal davis / rikrak


Pin It

Friday, June 15, 2012

{hand}making change: great pairings for a great cause!


.........................


well xanadu!
2 of my handmaking faves are collaborating on something extra special & i thought you nicies might just love it!

eco superstars eco karen & herban lifestyle have teamed up to bring us HERBAN CRAFTS: crafting DIY kits to provide us with everything we need to make our own yummy organic bath and body products. organic herbal soap kits. organic sugar body scrub kits. 

wow! wouldn't the kit make a wonderful gift for pretty much ANYONE on your giving lists? 

and to add to the fabulousness: listen to this: "Herban Crafts is a social enterprise – revenue from our sales will support job skills training for unemployed women." The project helps the very same unemployed women who prepare & package the kits!

isn't that fabulous?  support their crowd funding campaign at StartSomeGood from June 1 - June 30, 2012
eco friendly + beautiful + DIY + 2 of the niciest nicies around = one of my favourite things, indeed! yay craftivism!

herban crafts

...........
herban lifestyle
...........
 
eco karen
...........
have a gorgeous weekend, superstars!


Pin It

Wednesday, June 13, 2012

handmaking with kids : DIY lacing beads


fresh off her 2012 Handmade Olympics GOLD medal (where her gorgeous wooden stacking bowls were voted favourite eco-goodie!) , gail of *bright life toys* is sharing a fun & fabulous lacing beads DIY with us today! you'll just love this easy & charming project, as well as adoring the creative play for creative kids toys in gail's gorgeous, bright & beautiful handmade shop. too!

yay to handmaking with kids!
and yay to beautiful handcrafted toys for kiddies, too!

bright life toys


MAKING LACING BEADS with the KIDS!
Materials Needed - (these can all be found at your local craft store)
-non toxic craft paint in a variety of colors
-paint brushes
-wooden beads in a variety of sizes
-a length of ribbon, shoe string or yarn
-someplace to set the beads while they dry (I used an old pie plate)
-plate (or palette, if you want to get fancy)
-nontoxic wood sealer*
........................

Lacing beads help a child to learn colors, shapes and sizes. They help to develop fine motor skills and coordination. Your little one will enjoy learning to sort, count and thread while playing with his / her lacing beads!

Due to the sizes of the pieces, I recommend this set for children 3+ or those that no longer mouth their toys. If the chosen beads are small, they can pose a choking hazard.

Wooden beads come in all shapes and sizes. For an easier set, use larger beads with a larger threading hole. For a more challenging set for older children, use smaller beads with a smaller threading hole.
........................ 

ONE: To begin this project, open the paint, and squirt a little of each color onto the plate, allowing plenty of room between colors. (Not that it will matter, because if your child is like mine, they will all get mixed together anyway.)
TWO: Dip the brush in the paint, and begin to paint each wooden bead. Allow your child's creativity to truly shine! 

THREE: When the bead is painted, set it on its end on the pie plate to allow it to dry.

FOUR: Allow the beads to dry for 3 hours, or until paint is dry to the touch.

FIVE: When the beads are dry, it is time to seal them. You have a couple of options - you can use a nontoxic wood sealer, which will make your paint shiny and protect it from color transfer or you can use beeswax wood polish. The choice is yours. The wood sealer can be found at local craft shops in the craft paint section.

If choosing to use a wood sealer, gently brush it on using a paint brush. This should be a grown-up job, as it can be messy. Set the beads on their ends once again to dry. Let dry overnight.
SIX: Once they are dry, it is time to play! Depending on your child's age and skill, you can use several things for the lacing part of this toy. Beginners (younger children) can start out with a shoestring. The end is easy to thread through the beads. More advanced / older children can use a ribbon or length of yarn. It will be more difficult to thread the bead onto.

For ease, you can tie a knot around one bead to prevent the others from slipping off.

Enjoy stringing the beads with your child!
.................
thanks so much, bright life toys! be sure to visit gail's other creations around the web, too!

made anything fun with kiddies lately?
tell us about it!


Pin It

Wednesday, May 9, 2012

sustainable scraps: vegetable gardening with *17 apart* {CELERY}


................


Hey there! We are Tim and Mary from 17 Apart — our little corner of the blog world where we love to share the things that make us tick, diy projects, recipes, the antics of our 2 year old weimaraner puppy, and a few surprises from time to time. We hope you’ll stop by and join our adventure.


tim & mary of 17 apart


................


about the sustainable scraps series: In our constant quest to live and eat in a more sustainable fashion, we have become big fans of learning to grow many different types of foods organically. After moving from a home with a big yard and lots of ground space for our garden, we then moved into a house in the heart of the city (Hey there, fellow Richmonders!) with no yard. Since then, we’ve been forced to think creatively to find vertical solutions in order to grow the same vegetables we once grew in the ground — and now find ourselves with a thriving container garden.

Through this creative gardening challenge, we’ve come across several other ways to grow vegetables both indoors and out right from the scraps of their previous counterparts. We’ve learned how resilient plants can be and we’re really amazed at how all they want to do is thrive to grow. Over the next few weeks we’ll be sharing examples of the vegetables we’ve been able to successfully re-grow into new food and beautiful houseplants.


................


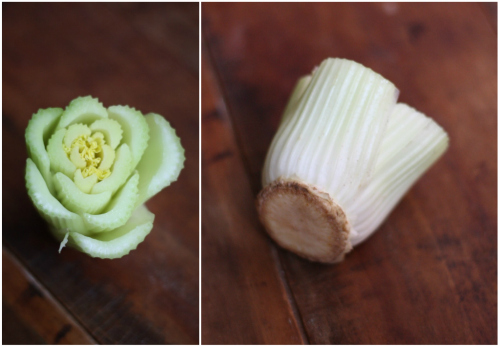
Did you know you can actually regrow many plants from their scraps? Well, it’s true and today we’re excited to share with you how easy it can be to regrow celery you’ve bought from the grocery store in your own home. 

To get started, simply chop the celery stalks from the base of the celery bunch you bought from the store and use them as you normally would. In our case, we had a particular homemade bean dip that needed sampling right away :)

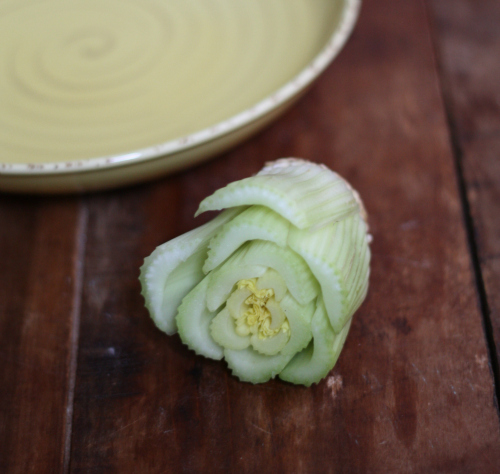
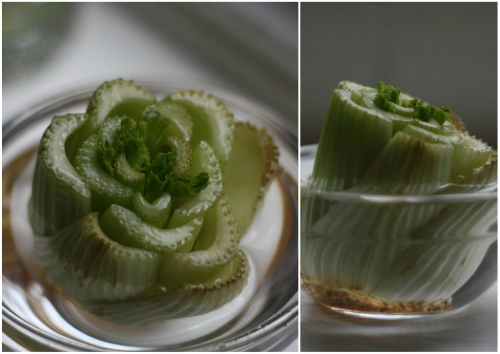
Instead of tossing the celery base, rinse it off and place it in a small saucer or bowl of warm water on or near a sunny windowsill — base side down and cut stalks facing upright. 


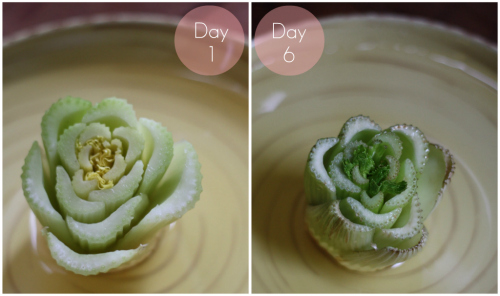
We let our celery base hang out in the saucer of water for right around one week, give or take. Over the course of the week, the surrounding stalks began to dry out significantly, but the tiny little yellow leaves from the center of the base began thickening, growing up and out from the center, and turned a dark green. 


The growth was slow, but steady and evident.


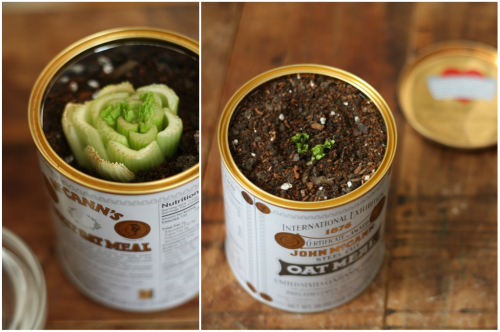
After the 5-7 days were complete, we transferred our celery base to a planter and covered it completely save for the leaf tips with a mixture of dirt and potting soil.


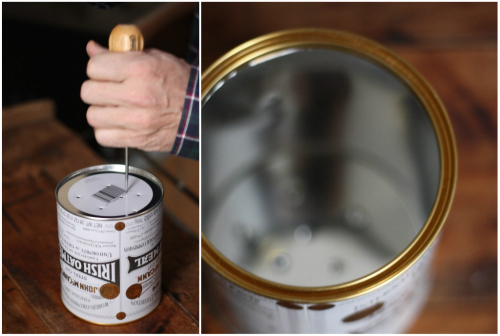
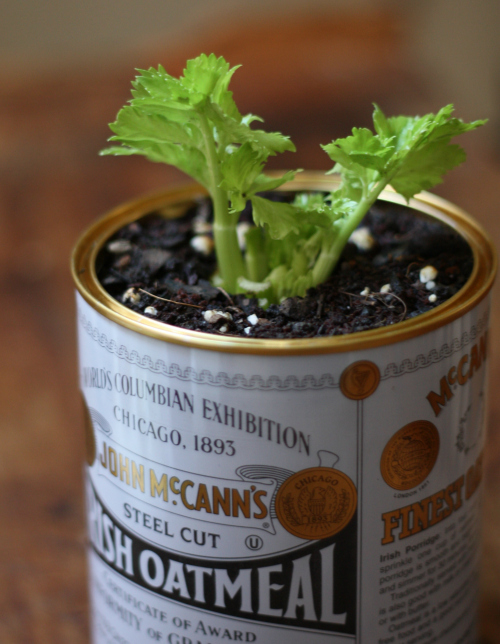
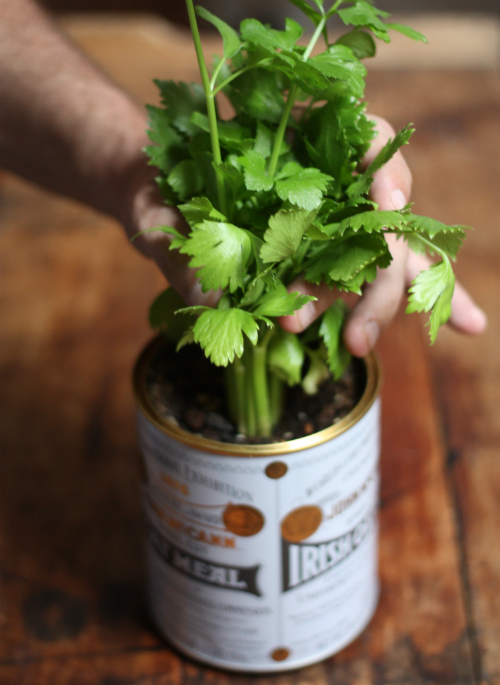
For the container, we decided to recycle a tin of steel cut oats we had on hand into a planter by essentially punching holes in the bottom of tin and fitting the top onto the base to allow for and catch drainage. 


Find full instructions for turning tins into a planter here, and keep in mind you can really use anything you have on hand for a planter so long as you create holes for drainage.
We placed a thin layer of mulch at the base to help with drainage, followed by a thick layer of dirt/potting soil mixture. After placing the celery base snugly in the planter, we filled the remaining space with more dirt/potting soil to completely cover the celery base. We kept the top to the oats tin and flipped it over to place the new planter on top of it — the lid is a perfect custom fit to the base and catches any runoff from regular watering.


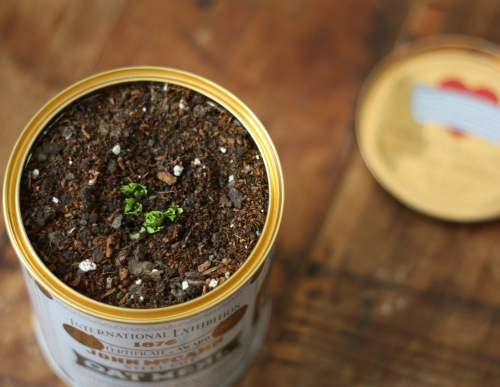
We watered it generously and after planting in the soil, the overall growth really took off. Not only did the celery leaves regenerate themselves from the base, but you could see clear stalks making their way up and out. 

Here’s what our progress looked like not even a week after planting the celery base in the container:


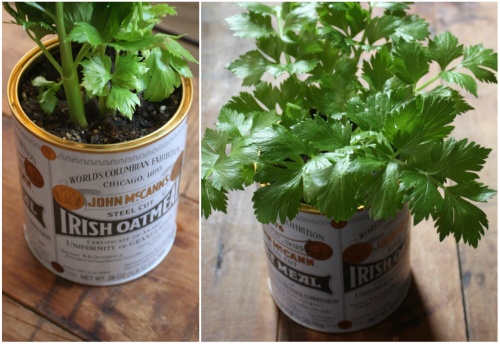
After a few more weeks of growing time in our sunny window, our celery has continued to thrive. The leaves have grown out generously and bushy and the celery stalks underneath have really taken shape:
 

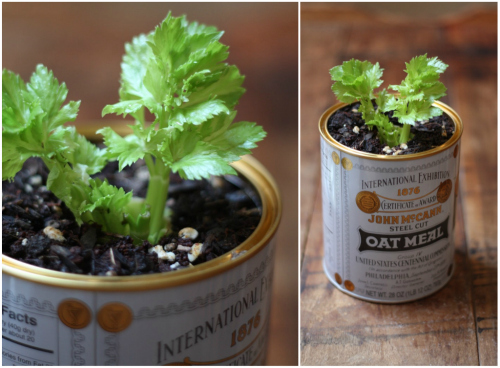
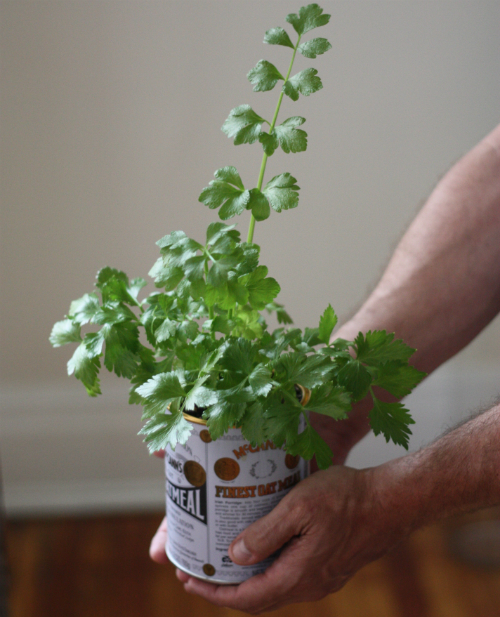
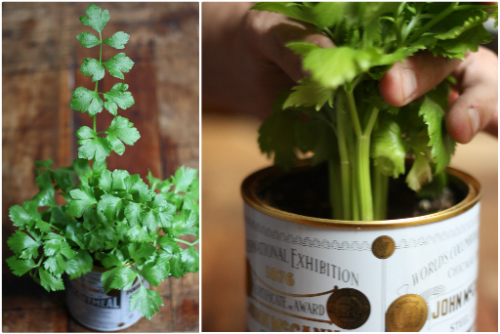
We are now at right around the 2 month mark from planting our little celery base and here’s what we’re currently looking like:


While not at the point where Tim can slather some pimento cheese on a thick stalk of celery, we’ve definitely got some steady progress along with a pretty little house plant. When planting celery from seed, the growing process can take 5 or more months to reach desired stalk size, so it’s a slow process that takes a little patience.

A few notes:
  • Change out the water every couple of days while in the "saucer" phase of the project. We also used a spray bottle to spray water directly onto the base of the celery where the leaves were growing out.
  • Some people have had luck planting their celery bases directly into the ground soil outside after the saucer phase — you may want to go this route if you live in a temperate area or want to be able to harvest outdoors. We went with an indoor planter since it's still pretty cold here in VA, we have limited outdoor space in the city, and the space we do have is currently unprotected from our curious puppy.
  • Continue to generously water the celery after planting to keep it thriving.
After seeing just how easy it can be to regrow celery, we hope you’ll give it a try and come back to let us all know how it’s going. Find our original blog post about re-growing celery from the base on our blog, 17 Apart, along with other gardening and DIY projects to try out.


We are now at right around the 2 month mark from planting our little celery base and here’s what we’re currently looking like:


................

thanks ever-so-much, tim & mary! 
so delighted to have you nicies on the blog (we're all such fans of your fabulous DIY & handcrafted lives.) peek at tim & mary's  beautiful new home, their gorgeous doggie Basil, & an abundance of mouth-watering recipes as a wee little intro to these inspiring handmaking superstars.
& be sure to tune in soon for the next installment of the 17 apart series: 
sustainable scraps!
what are you growing these days, nicies? 
we'd love to hear!


Pin It