

photo by John Paul Urizar via taste.com
.................
morning, nicies!
today begins the EtsyMom blog hop, a chance to visit lots of great blogs by handmaking mommies, share in some fabulous festive recipes and craft ideas, AND win a bunch of amazing goodies while you're at it!
so to kick things off, thought i'd share one of my family's favourite crafty recipes with you.
it's a great chance to encourage little hands and their creative imaginations!
One-of-A-Kind Keepsake Salt Dough Ornaments Tutorial & Recipe
 |
| DIY family ornaments ideas at country woman magazine |
Every year, one of our family's favourite Holiday events is the annual tradition of handmaking Christmas Tree Ornaments! As an adult, our tree is filled with those treasured keepsakes my hubby + I created as children alongside our own little one's festive creations! I just love it!
So here's a festive handmade Holiday ornament for you and your child to create! The project is a perfect make-together activity filled with lots of opportunities to be creative in the kitchen. Using a classic salt-dough recipe, we'll add modern abtsract painting fun! The result is a gift-giving collection of beautiful, original ornaments featuring one-of-a-kind abstract artwork by your budding little Picasso! It's fun for artists of all ages and it's a wonderful, hands-on introduction to the world of modern abstract painting, too! The ornaments are fun to give individually, in small sets of 3, or why not wrap up a whole set for grandma or grandpa! Don't forget to save some for your own tree - those little artworks will be treasured for many Happy Holidays to come!! Happy creating!
So here's a festive handmade Holiday ornament for you and your child to create! The project is a perfect make-together activity filled with lots of opportunities to be creative in the kitchen. Using a classic salt-dough recipe, we'll add modern abtsract painting fun! The result is a gift-giving collection of beautiful, original ornaments featuring one-of-a-kind abstract artwork by your budding little Picasso! It's fun for artists of all ages and it's a wonderful, hands-on introduction to the world of modern abstract painting, too! The ornaments are fun to give individually, in small sets of 3, or why not wrap up a whole set for grandma or grandpa! Don't forget to save some for your own tree - those little artworks will be treasured for many Happy Holidays to come!! Happy creating!
WHAT YOU'LL NEED
2 cups flour + a bit more for dusting
1 cup salt
1 cup warm water
mixing bowl or food processor
rolling pin
cookie cutters
straw
baking tray
oven
child-friendly paints
paint brushes
ribbon or string
thin tip marker
your delightful imagination!
2 cups flour + a bit more for dusting
1 cup salt
1 cup warm water
mixing bowl or food processor
rolling pin
cookie cutters
straw
baking tray
oven
child-friendly paints
paint brushes
ribbon or string
thin tip marker
your delightful imagination!
.................
ornaments by little rikrak :: photo by me

 |
| making fun 3D shapes on diynatural.com |
HOW TO DO IT
*It's the most fun if your child can participate in all of the steps along the way! Making a BIG mess is half the fun! *
*It's the most fun if your child can participate in all of the steps along the way! Making a BIG mess is half the fun! *
1. Mix salt & flour.
2. Add in half the water, mix, then gradually add the remaining water.
3. Knead mixture until the dough is smooth (up to 10 minutes by hand; about 2 minutes on low via food processor.) Add pinches of flour to create a pliable dough that isn't sticky.
4. For flat dough ornaments, roll out the dough on baking paper or a floured surface. Aim for a dough thickness of about 1/4 -1/2 inch. This will be sturdy enough for little hands to help transfer to the baking sheet, and not too thick for even baking.
5. Using fun cookie cutters or your hands, create fun shapes. Remember, the top surface of the *cookie* shape will be your child's canvas - so aim for a greater surface in the shapes you choose. It will be easier for young hands to create their masterpieces! (Circles, stars, snowflake shapes work well!)
 |
| getting the ornaments ready for baking on e-how. |
7. IMPORTANT: BEFORE BAKING --> USE the STRAW to make a hole near the top so you can hang the ornament later.
8. Bake the ornaments at 325 degrees for 30-40 minutes, depending on the thickness of the ornaments - or until dry. While the ornaments are baking, this is a great time to talk with your little one about the fun & freedom of abstract painting. Experiment on paper before working with your ornaments so your child can get a feeling for freestyle painting. Share fun modern art books or websites to enrich the experience. Chat about the terminology of artistic experimenting: dots, lines, colours, curves, shapes, feelings. etc. and encourage your child to paint freely to various emotive words: happy, sad, excited, etc. Practice these for fun on paper. Paint with your child! They'll love seeing how you interpret the emotions, too! Remember - there is no right or wrong in abstract painting!
9. Let ornaments cool before you begin decorating.
10. Let the creativity begin! Turn on some festive music and let your little picasso enjoy splattering and splotting and decorating the tiny ornament surfaces with a variety of paintbrushes! Children 3 and up might love using 3-D puffy paints once a base coat is painted. They add extra texture and dimension to the sweet ornaments. Try painting some of the surfaces a solid colour, letting those dry, and adding new delights on top! Try gluing on beads, buttons, or any fun goodies you can think of. Let your creativity soar!
11. Optional: to preserve, coat with a child-safe paint varnish once everything is dry!
12. Loop string or ribbon thru dried ornament. Wrap in eco-friendly paper your child has decorated, and your handmade Holiday ornament is ready to give!
13. This recipe makes an ornament collection of approximately 20 2-inch wide ornaments, although it's much funner when each ornament is it's own unique size!
FUN NOTES:
- Older children might enjoy making 3 dimensional shapes with greater details.
- Experiment with using various fun kitchen *tools* to add texture to the top of the ornament dough before baking. try finger prints, child-safe kitchen utensils, etc. Play with the patterns and shapes they create!
- Use the marker to have your child print their name on the back of the dried ornament (or adults can help!) and add the year for extra keepsake fun!
Happy handmade holidays!
Kristal Davis a.k.a. rikrak
my handmade shop: www.rikrak.etsy.com
my handmade blog: www.rikrakstudio.blogspot.com
and now....
off to see the rest of the fabulous blog hop!

Check out all of the fabulous holiday-themed projects, gift ideas, and more from our wonderful EtsyMom Blog Hop Contributors from around the world!!
www.singingthreelittlebirds.blogspot.com/
www.camelotstreasures.blogspot.com
www.stoneymistdesignetsy.blogspot.com/
www.aloniacreations.blogspot.com/
www.homemadebyamanda.blogspot.com/
www.annavirginiafashion.blogspot.com/
www.mylavenderave.blogspot.com/
www.babyjives.blogspot.com
www.babyswank.blogspot.com/
www.babysindulgencebyjocelyn.blogspot.com/
www.handmadewhimzy.blogspot.com/
www.katekatenyc.blogspot.com
www.caramagic.blogspot.com/
www.onlyterrastreasures.blogspot.com/
www.silverrosedesigns.blogspot.com
www.onlyterrastreasures.blogspot.com/
www.silverrosedesigns.blogspot.com
Here's how it works:
1. Hop through each of the blogs listed above to get fabulous holiday inspiration and leave a comment. If you are starting at a blog in the middle of the Hop, start back at the EtsyMom Blog.
2. Leave a comment on this post between now and December 11, 2010.
3. Enter to win our giveaway by doing any of the following. For each thing you do, you will be entered into the drawing one more time:
~Leave a comment on this post between now and December 11, 2010.
~Leave a comment on the Holly Day Blog Hop posts for any of the blogs listed above between Dec 5 and Dec 11, 2010.
~Join our email list (fill out the form in the right hand column).
~Become a follower of this blog! Just click the "Follow" button in the lower right column.
~"Like" the EtsyMom Facebook Page.
Share about this Blog Hop on your own blog, posting a link to this page.
Share about this Blog Hop on Facebook, posting a link to this page.
Share about this Blog Hop on a message board or forum, posting a link to this page.
To let us know you've done these things, please GO to
sorry - you cannot enter the giveaway here on my blog.
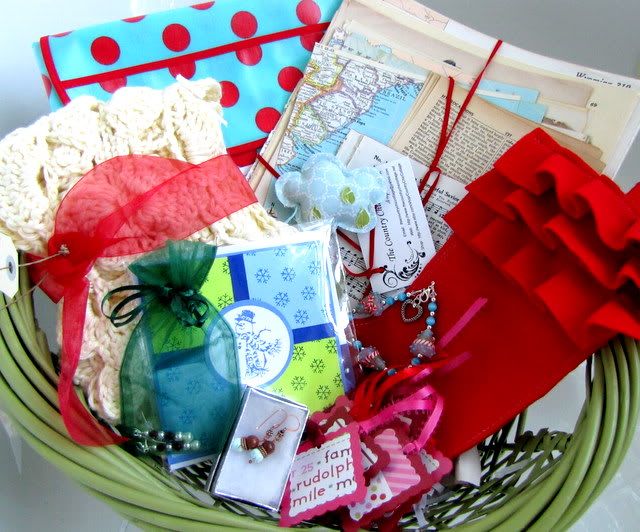
and leave a comment for each thing you did, i.e. one comment for posting on your blog, another comment for posting on facebook, and another comment for joining our email newsletter. If you post it all in one comment, it will count as one entry.On December 11, 2010 we'll choose a winner using the Random Integer Generator from random.org. The winner will receive this super sweet gift basket full of handmade holiday goodies, including
a pair of Turquoise Earrings from http://www.stoneymistdesign.etsy.com/
a greeting card from http://www.homemadebyamanda.etsy.com/
a lampwork bead bracelet by http://handmadewhimzy.etsy.com/
sterling silver and Swarovski pearl/crystal holiday earrings by
a cream colored cotton scarf given by http://www.zoegirldesigns.etsy.com/
a raincloud ornament from http://www.etsy.com/shop/babyjives
a matching splat mat and baby bib from http://www.babysindulgence.etsy.com/
two pair of earrings from http://quirefly.etsy.com/
a gift pack of over 30 pages of vintage paper ephemera by http://www.etsy.com/shop/countrychiccottage
a gift pack of over 30 pages of vintage paper ephemera by http://www.etsy.com/shop/countrychiccottage
a lovely sustainable stocking from http://www.rikrak.etsy.com/
a set of holly jolly gift tags from http://cinnamonspice.etsy.com/
a set of toddler pajamas in a style of the winner's choice from http://heatheregley.etsy.com/
a $15 gift certificate from http://camelotstreasures.etsy.com/
A gift certificate from http://babyswank.etsy,com/
have a great day, cuties!
Pin It


Wonderful Kristal !
ReplyDeleteThanks so much for your time to sharing this beauty !
Cheers
Feyza
Thanks for the tutorial! My kids are going to love doing this.
ReplyDeletethanks sweeties!
ReplyDeleteit's a fave of ours, and so simple and wonderful!
have fun!
what a great tutorial!
ReplyDeleteSOOO Cute! We'll definitely try these!
ReplyDeleteThanks for the great kid project!
ReplyDeleteAwesome! great project to do with my boys, they will love it!! Thanks!
ReplyDeleteGreat project idea! Thanks so much for sharing, I think my daughter will have a blast doing this since she's always trying to get into my paperclay! :)
ReplyDeleteyou've inspired me to make these with my kids!
ReplyDeleteThanks, Karen
Those are very cute.
ReplyDeleteI have a giveaway posted on my blog - a gift card sponsored by CSN Stores. Please do come over and enter.
I still have the ones like this that my daughters made in Pre-K! Love them!
ReplyDeleteMy kids are going to have so much fun trying this one out. My mom has some still on her tree from me when I was little.
ReplyDeletemframe00@gmail.com
Those are beautiful! They would be a great idea for something to do with my little girl when she gets older!
ReplyDeleteThanks for sharing - love it!
ReplyDeleteMy kids love working with salt dough..we will have to try the ornament idea!
ReplyDeleteWhat a fun project! We used to have a handmade tree, but I finally convinced my mom to get rid off all those ornaments when I was about 20! *lol*
ReplyDeletesuch a cool idea to do w/ your kids each year. love this, TFS!!!
ReplyDeleteWhat care went into this tutorial! I am so excited to do this with my little guy!
ReplyDeleteThis is such a great idea! Thank you for sharing the recipe with us - I can't wait to try it with my kids! :)
ReplyDeleteHeather
All You Need Designs